


The flat tire scenario is, frankly, the most irritating situation for every driver. It usually happens at the worst possible time, either you’re late for the office, or you’re out on the highway at night. And when the tire gets punctured and there’s no puncture shop nearby, nor is a spare tire useful, it feels like you are completely stuck in the situation.
At such times, a small thing becomes a lifesaver – a tire sealant kit. This isn’t a permanent solution, but yes, it’s important enough to make your car temporarily drivable. Meaning, you can drive your car a short distance and take it to a safe place or a mechanic.
In this blog, we will explain, in simple steps and easy explanations, what a sealant kit is, how to use it, and how safe it is. If you’ve ever encountered a puncture on the road, this guide will definitely come in handy.
Tire Sealant Kit Guide: Quick Guide for Car Owners
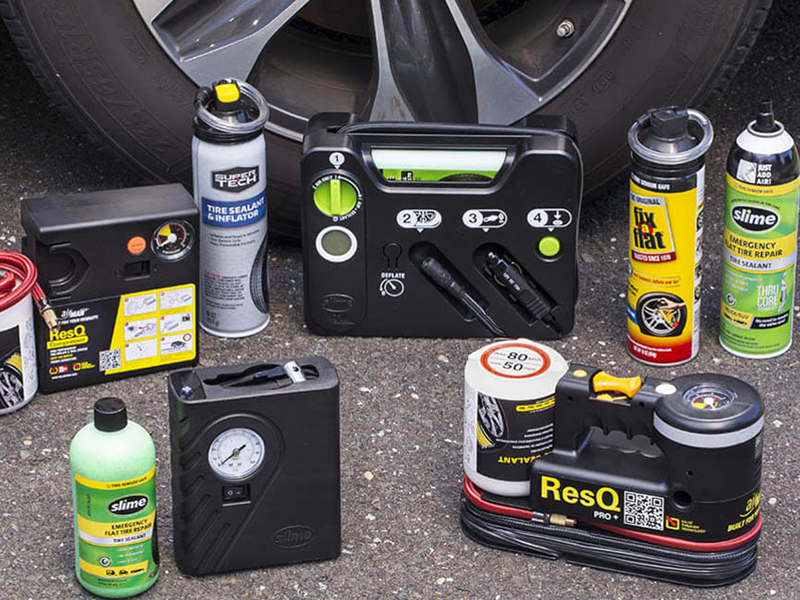
A tire sealant kit is a simple solution that comes in handy in case of a puncture. It contains a bottle of liquid and a pipe or small pump. This fluid enters the tire, seals the hole, and prevents air from leaving. It is only utilized in an emergency to get the car to a mechanic or a safe location. Not all sealants are compatible with all tires because some are made especially for tubeless tires. Check the bottle’s expiration date & make sure you’re following the directions. Recall that this is not a long-term solution. After use, the tire must be shown to a mechanic; otherwise, residue will remain.
Step-by-Step Process: How to Temporarily Fix a Flat Tire Using a Sealant Kit
- Safe parking – Stop the vehicle in a safe place on the side of the road, turn on the hazard lights, and apply the handbrake.
- Prepare the tire – Remove the valve cap from the flat tire and clean the tire slightly if there is excessive dirt on the outside.
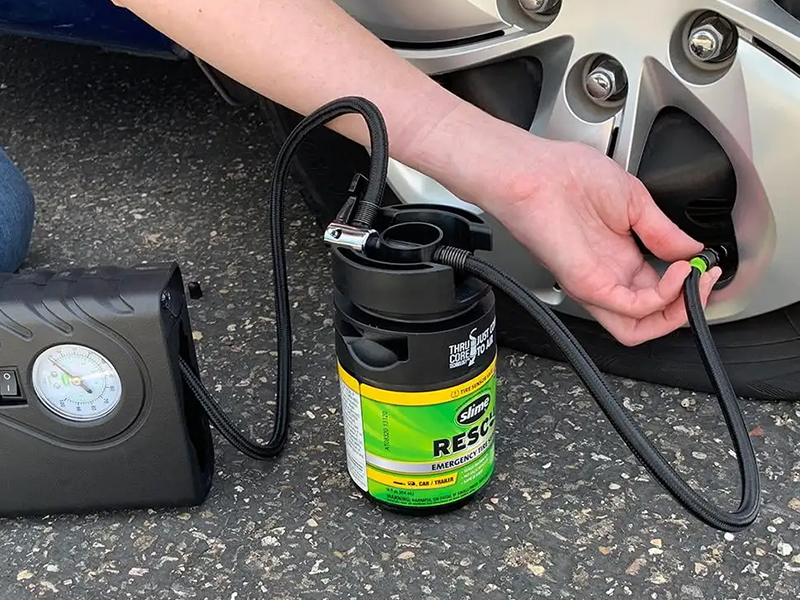
- Attach the hose – Connect the sealant bottle to the hose/adapter and tighten the hose to the valve.
- Inject the sealant – Inject the liquid in the bottle completely into the tire (as per instructions).
- Inflate the tire – If the kit includes a compressor, fill the tire to the recommended pressure; if not, inflate it with the nearest pump.
- Drive slowly – Drive for 5–10 km at a slow speed (around 30–40 km/h) so that the sealant spreads evenly inside the tire and seals the hole.
- Check the pressure – Check the tire pressure again after a few kilometers; If the air pressure is low again, go to a mechanic.
- Inform the mechanic – As soon as possible, inform the workshop that sealant has been used so they can properly clean and repair the tire.
Temporary Flat Tire Repair: Things You Should Know Before Starting
Before using sealant, understand a few basic things: First, it’s only for small punctures — usually nails or small holes in the tread area. If the tire sidewall is cut or there’s major damage, such as a bullet, sealant won’t work. Secondly, a sealant that is too old or an expired bottle is not effective, so it’s a good idea to check it from time to time. Thirdly, some sealants can affect the tyre pressure sensors (TPMS) and leave residue on the rim – so be sure to inform the mechanic. Sealant is temporary – it’s not designed for high-speed sustained running on long drives. Always plan safe speeds and short distances until the tyre is professionally checked. Wear gloves and read the instructions carefully; most kits have clear steps written on them. Use the sealant only after knowing all this so that you can make smart decisions in an emergency.
Emergency Tire Puncture Repair: When to Use a Sealant Kit
Sealant kits are most useful in emergencies – when you’re stuck in a remote area, at night, or on a busy highway, and can’t find a nearby repair shop. If you don’t have a spare tire or it’s difficult to use one, sealant provides a quick option to tow your car a short distance. But think before choosing a tire: if the puncture is large, the tire is burst, or the sidewall is damaged, sealant may be useless – it’s better to call a tow service. In emergency use, the sealant process is simple and fast (inject + inflate + drive a little), so it doesn’t take much time. Sealant is most useful when you’re traveling at night and there aren’t any garages open nearby. At such times, you can simply apply sealant, drive home, or to the service center. But always put safety first – if the road doesn’t seem safe, park your car in a safe place on the side, then apply sealant.
Flat Tire Quick Fix: Tips to Drive Safely After Using Sealant
After applying sealant, the tire is ready to drive, but it’s important to follow some basic safety tips. First, reduce your speed – generally avoid speeds above 60–70 km/h and avoid heavy acceleration. Second, don’t plan long trips; only go to the nearest mechanic or workshop, as the sealant is a temporary fix. After applying sealant, keep checking the tyre pressure every 10-15 km. If the pressure is falling, stop the vehicle and have a look. If the steering feels heavy while driving, vibrations are heard or strange noises are heard, then immediately park the vehicle on the side; it is possible that the seal is not seated properly. Do not carry too much load, extra weight increases tyre pressure and the sealant can move from its place. And most importantly, inform the mechanic that sealant has been used, so that he can remove the tyre, clean it properly, and do a permanent repair.
Limitations of Tire Sealant Kits and When to Visit a Mechanic
A sealant kit is useful, but it can’t do everything – it has some clear limits. Sealant only temporarily repairs small punctures. It won’t work if there is a cut or a big hole in the tire’s side. The sealant may occasionally adhere to the valve and rim, which could throw off the tire’s balance and result in wrong readings from the sensor. Don’t consider sealant a permanent fix. As soon as you reach a safe place, it’s important to show the tire to a mechanic – he will remove the sealant and plug/patch the puncture or, if the damage is severe, may ask for a tire replacement. The mechanic will also balance and align the tire to ensure a smooth drive. In short, the sealant provides temporary relief; for real repair and safety, professional inspection is mandatory.
Conclusion:
Flat tyre problem is one of the most unexpected and frustrating things on the road. It always happens when you are in the most hurry. At such times, a tyre sealant kit comes in very handy as it provides you with instant relief.
Look, sealant is always a temporary fix. It only works so long as you can safely drive your vehicle to the nearest petrol pump or garage. After applying sealant, don’t overload, don’t drive long & don’t drive fast. Keep checking your tire pressure or if you hear vibrations or strange noises while driving, pull over immediately.
A visit to a mechanic is compulsory as only he can make your tyre reliable by carrying out proper repair or replacement. You will never be left powerless by a flat tyre if you have a sealant kit in your car and know how to use it properly. In an emergency, this small gadget can make a tremendous impact.
FAQ’s
1. How to use temporary flat tire sealant?
To use the temporary sealant, shake the bottle well. Open the tire valve cap and attach the sealant nozzle. Inject the sealant inside. Then, fill the tire with air and drive a little so that the sealant spreads evenly. This is only for emergencies.
2. How to use tire sealant on a flat tire?
First, remove the valve cap of the flat tire. Shake the sealant bottle and connect it to the nozzle valve. Press the sealant inside and then fill the tire with air. It is important to drive the car for 1-2 kilometers so that the sealant can rub in and seal the puncture hole. This is not a permanent fix.
3. How to temporarily seal a tire?
If a tire is punctured and immediate help is not available, sealant can be used. Connect the sealant bottle to the tire valve and insert it inside, then fill it with a little air. The little hole within the car is sealed by the sealant when it is driven. The tyre will then need to be properly repaired; this is merely an emergency fix.
4. How to fix a flat tire step by step?
Applying the handbrake and stopping the vehicle on the safe side are the initial steps in fixing a flat tyre. Now lift the automobile a little with a jack. Remove the punctured tire by gradually loosening the lug nuts. Tighten the nuts and replace them with a spare tyre. Lower the car back to the ground and check the nuts one more time. This method allows you to easily change a tire on the roadside.
5. How to repair a flat tire with a repair kit?
The repair kit includes a reamer tool, a rubber strip, and a plug tool. Find the puncture hole and clean it with the reamer tool. Fit the rubber strip to the plug tool, push it into the hole, leaving half the strip outside. Cut off the excess. Then fill the tire with air and test it.
